With Summer comes long, hot summer evening, just perfect for trying to learn a new type of photography and learning new skills.For this article I traveled to the 2011 Ohio High School Rodeo Finals in Seymour, Ohio.
For most events like this you do not really need any press credentials. Just pay your fee and belly up to the rail with everyone else. You will most likely be welcomed.

This even ran for three days with morning and evening performances. I went to the Saturday evening even to show you how we would cover an event like this in rapidly changing lighting. The evening started in bright sunlight, after a summer thunder storm had cleared.
The first photo was the newly crowned Ohio High School Rodeo Queen. I like to shoot even in the brightest light with my lens wide open to blur the background and make my subject really pop. This is a decent photo with a very messy background, if it were not so far out of focus. This was taken with a Nikon D700 and Nikon 300mm f2.8 lens, ISO 200, 1/3200 at f2.8.
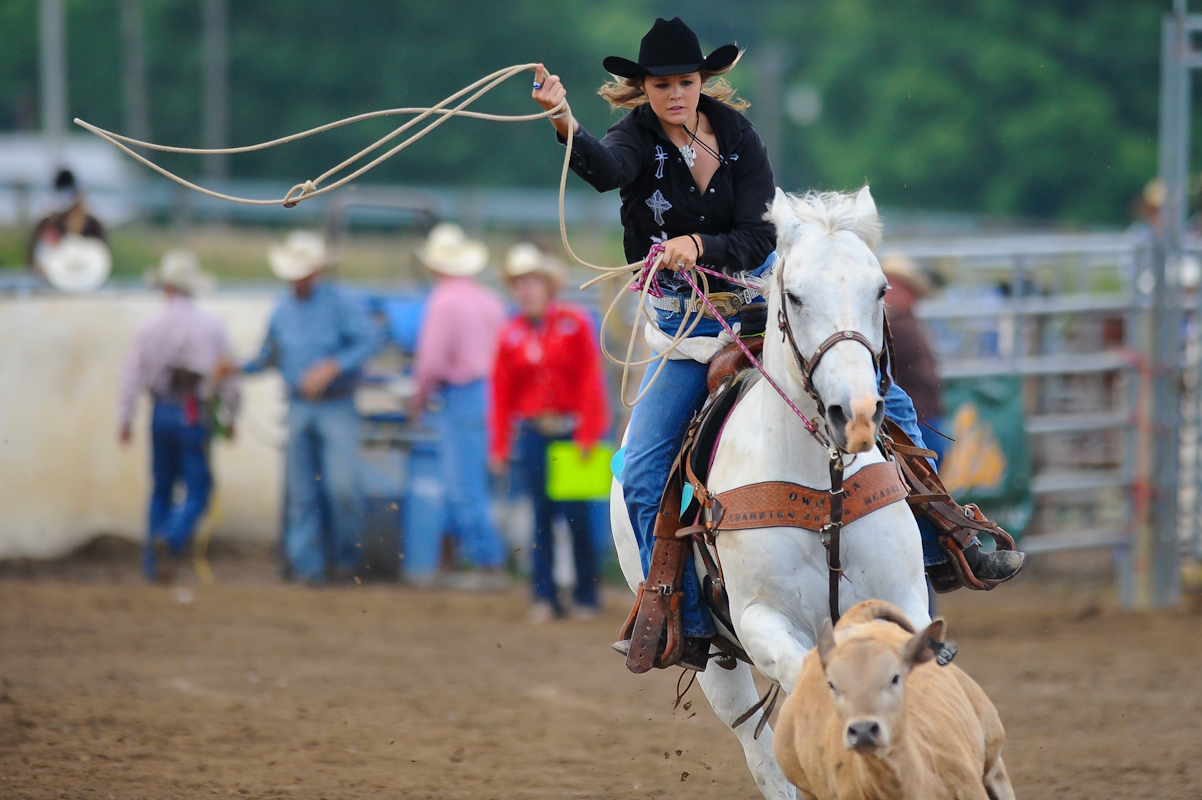
First event up was Breakaway Roping. Breakaway roping is a variation of calf roping where a calf is roped, but not thrown and tied. It is a rodeo event that features a calf and one mounted rider. The calves are moved one at a time through narrow runs leading to a chute with spring-loaded doors. The horse and rider wait in a box next to the chute that has a spring-loaded rope, known as the barrier, stretched in front. A light rope is fastened from the chute to the calf's neck, releasing once the calf is well away from the chute and releasing the barrier, which is used to ensure that the calf gets a head start.

Once the barrier has released, the horse runs out of the box while the roper attempts to throw a lasso around the neck of the calf. Once the rope is around the calf's neck, the roper signals the horse to stop suddenly. The rope is tied to the saddle horn with a string. When the calf hits the end of the rope, the rope is pulled tight and the string breaks. The breaking of the string marks the end of the run. The rope usually has a small bright flag at the end that makes the moment the rope breaks more easily seen by the timer. The fastest run wins.
The sun had gone away when these were taken with a Nikon D700 and Nikon 300mm f2.8 lens, ISO 800 to 1600 depending on the light, 1/3200 at f2.8.
For this and most rodeo events and horse shows I want to use a pretty long lens, usually a 300mm or a 70-200mm zoom. I want to get back away from the action, and try to find an advantage point where the horse will be coming right at me, like the bottom photos.
Next up was Steer Wrestling:
Steer wrestling, also known as bulldogging, is a rodeo event in which a horse-mounted rider chases a steer, drops from the horse to the steer, then wrestles the steer to the ground by twisting its horns.

The event features a steer and two mounted cowboys, along with a number of supporting characters. The steers are moved through narrow pathways leading to a chute with spring loaded doors. A barrier rope is fastened around the steer's neck which is used to ensure that the steer gets a head start. The rope length is determined by arena length. On one side of the chute is the hazer, whose job is to ride parallel with the steer once it begins running and ensure it runs in a straight line, on the other side of the chute the steer wrestler or bulldogger waits behind a taut rope fastened with an easily broken string which is fastened to the rope on the steer. When the steer wrestler is ready he calls for the steer by nodding his head and the chute man trips a lever opening the doors. The suddenly freed steer breaks out running, shadowed by the hazer. When the steer reaches the end of his rope, it pops off and simultaneously releases the barrier for the steer wrestler. The steer wrestler attempts to catch up to the running steer, lean over the side of the horse which is running flat out and grab the horns of the running steer. The steer wrestler then is pulled off his horse by the slowing steer and plants his heels into the dirt further slowing the steer and himself. He then takes one hand off the horns, reaches down and grabs the nose of the steer pulling the steer off balance and ultimately throwing the steer to the ground. Once all four legs are off the ground, an official waves a flag marking the official end and a time is taken. The steer is released and trots off.

Sun was coming and going when these were taken with a Nikon D700 and Nikon 300mm f2.8 lens, ISO 800 to 1600 depending on the light, 1/3200 at f2.8.
Barrel Racing was next:
In Barrel Racing the purpose is to make a run as fast as possible. The times are measured either by an Electric eye, a device using a laser system to record times, or by a judge who drops a flag to let the timer know when to hit the timer stop. Judges and timers are more commonly seen in local and non-professional events. The timer begins when horse and rider cross the start line, and ends when the barrel pattern has been successfully executed and horse and rider cross the finish line. The rider's time depends on several factors, most commonly the horse's physical and mental condition, the rider's horsemanship abilities, and the type of ground or footing (the quality, depth, content, etc. of the sand or dirt in the arena). This pattern is often referred to as a "Cloverleaf" The pattern may also begin with the left barrel first. Beginning a barrel race, the horse and rider will enter the arena at top speed, through the center entrance (or alley if in a rodeo arena). Once in the arena, the electronic timer beam is crossed by the horse and rider. The timer keeps running until the beam is crossed again at the end of the run. Modern barrel-racing horses need to not only be fast; but strong, agile and intelligent as well. The strength and agility are needed to maneuver the course in as little distance as possible. A horse that is able to "hug the barrels" as well as maneuver the course quickly and accurately follow commands, will be a horse with consistently low times.

Next comes Calf Roping:
Calf roping, also known as tie-down roping, is a rodeo event that features a calf and a rider mounted on a horse. The goal of this timed event is for the rider to catch the calf by throwing a loop of rope from a lariat around its neck, dismount from the horse, run to the calf, and restrain it by tying three legs together, in as short a time as possible.
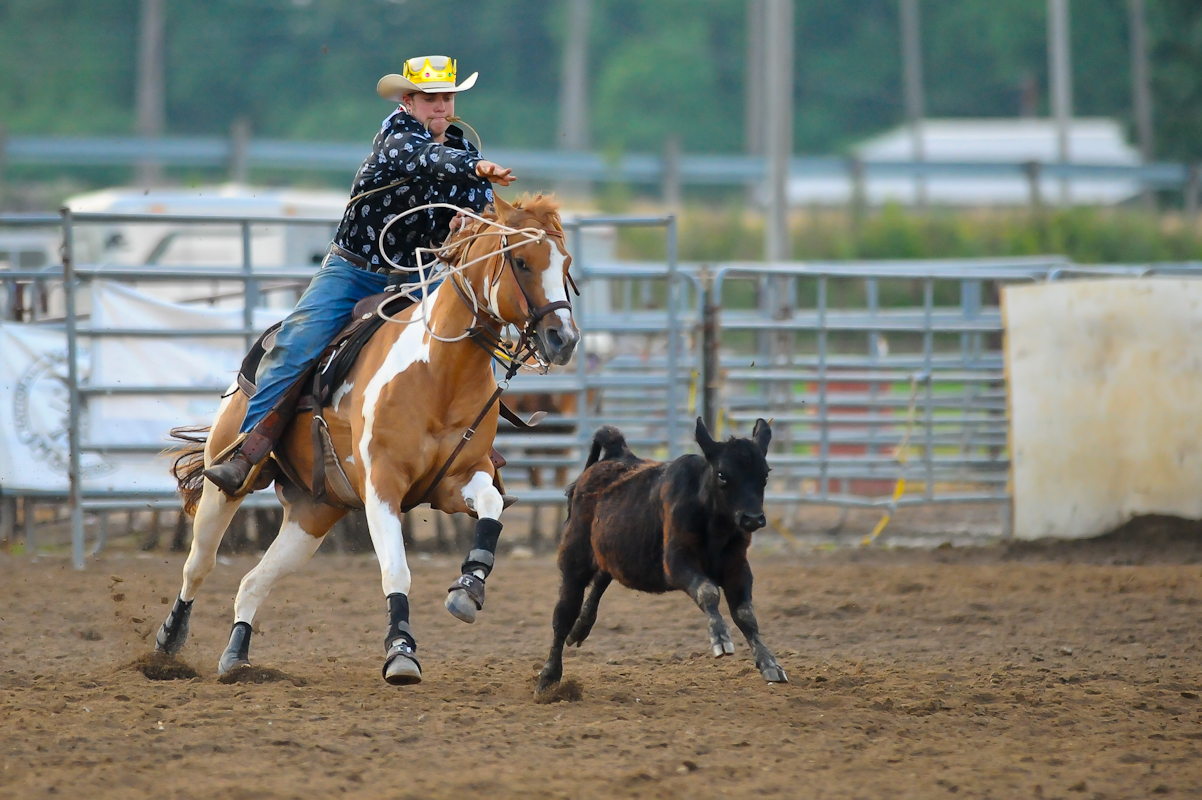
The calves are lined up in a row and moved through narrow runways leading to a chute with spring-loaded doors. When a calf enters the chute, a door is closed behind it and a lightweight 28-foot (8.5 m) rope, attached to a trip lever, is fastened around the calf's neck. The lever holds a taut cord or "barrier" that runs across a large pen or "box" at one side of the calf chute, where the horse and rider wait. The barrier is used to ensure that the calf gets a head start. When the roper is ready, he (or, in some roping events, she) calls for the calf, and the chute operator pulls a lever opening the chute doors and releasing the calf. The calf runs out in a straight line. When the calf reaches the end of the rope, that trips the lever, the rope falls off the calf, and the barrier for the horse is released, starting the clock and allowing horse and rider to chase the calf. Calf Roping event at the Calgary Stampede Timing is critical. From a standstill, a rider will put his horse into a gallop from the box shortly after the calf leaves the chute, so that the horse saves valuable seconds by being at near-full speed the moment the barrier releases. However, if the rider mistimes his cue to the horse and the horse breaks the barrier before it releases, a 10-second penalty will be added to his time.

This is sometimes referred to as a "Cowboy Speeding Ticket." The rider must lasso the calf from horseback by throwing a loop of the lariat around the calf's neck. Once the rope is around the calf's neck, the roper signals the horse to stop quickly while he dismounts and runs to the calf. The calf must be stopped by the rope but cannot be thrown to the ground by the rope. If the calf falls, the roper loses seconds because he must allow the calf to get back on its feet. When the roper reaches the calf, he picks it up and flips it onto its side. Once the calf is on the ground, the roper ties three of the calf's legs together with a short rope known as a "piggin' string". A half-hitch knot is used, sometimes referred to colloquially as "two wraps and a hooey" or a "wrap and a slap". The piggin' string is often carried between the roper's teeth until he uses it. The horse is trained to assist the roper by slowly backing away from the calf to maintain a steady tension on the rope. When the tie is complete, the roper throws his hands in the air to signal "time" and stop the clock. The roper then returns to his horse, mounts, and moves the horse forward to relax the tension on the rope. The timer waits for six seconds, during which the calf must stay tied before an official time is recorded.
Again I will place myself near the far end of the arena and try to catch the horse and rider coming toward me. I like to time the rope to get a throw in mid air, hopefully catching the calf.
Next was Pole Bending:
Pole bending is timed event that features a horse and one mounted rider, running a weaving or serpentine path around six poles arranged in a line. This event is usually seen in high school rodeos and 4-H events as well as American Quarter Horse Association, local National Barrel Horse Association shows, Paint and Appaloosa sanctioned shows as well as at many gymkhana or O-Mok-See events.

Setting up the pole bending pattern is crucial to the success of this event. The pole bending pattern is to be run around six poles. Each pole is to be 21 feet (6.4 meters) apart, and the first pole is to be 21 feet (6.4 meters) from the starting line. Poles shall be set on top of the ground, six feet (1.8 meters) in height, with no base more than 14 inches (35 cm) in diameter. These are the measurements implemented and endorsed by the National High School Rodeo Association.

The purpose of a universal pattern is to be able to track and compare times everywhere poles are run. Good horsemanship is the foundation for success in pole bending and barrel racing. The horse and rider team must work as one in order to excel. Each contestant will begin from a running start, and time shall begin and end as the horse's nose crosses the line. A clearly visible starting line must be provided. An electric timer or at least two watches shall be used, with the time indicated by the electric timer or the average time of the watches used by official timers to be the official time. A horse may start either to the right or to the left of the first pole and then run the remainder of the pattern accordingly. Knocking over a pole shall carry a five-second penalty. Failure to follow the course shall cause disqualification. A contestant may touch a pole with his or her hand in pole bending. Poles shall be shall be set on top of the ground, 6 feet in height, and mounted in bases with a 14 inch diameter. Poles shall be PVC pipe, and bases shall be rubber or plastic. For added safety, PVC caps are recommended. Preferred color for poles is natural white, but red, white, and blue rings shall be allowed. Solid rubber bases are preferred, but hollow plastic bases shall be allowed only if filled completely to emulate a solid base. When riding a horse through the poles, the rider must first look to where they want to go. It is essential that the rider sits in the saddle and uses lower body and legs to navigate their horse through the poles. Forward motion must be maintained in order to keep all of the poles standing. The use of the horse's hindquarters helps the horse zigzag through the poles in a smooth weave.

Sun was gone by this time and the very poor area lights only filled the dust slightly Nikon D700 and Nikon 300mm f2.8 lens, ISO 6400 depending on the light, 1/800 at f2.8.

Finally time for Bull Riding:
Bull riding refers to rodeo sports that involve a rider getting on a large bull and attempting to stay mounted while the animal attempts to buck off the rider. In the American tradition the rider must stay atop the bucking bull for eight seconds. The rider tightly fastens one hand to the bull with a long braided rope. It is a risky sport and has been called "the most dangerous eight seconds in sports."

In this photo a very lucky bull rider is caught in his rope and dragged by a very mad bull. The rodeo clown kept him safe while a mob of men jumped in the ring to hold the bull back. One of the fast thinking man was able to cut the rope with his knife to free the rider. Photo was lit by one very old light pole above me.
A rider mounts a bull and grips a flat braided rope. After he secures a good grip on the rope, the rider nods to signal he is ready. The bucking chute (a small enclosure which opens from the side) is opened and the bull storms out into the arena. The rider must attempt to stay on the bull for at least eight seconds, while only touching the bull with his riding hand. His other hand must remain free for the duration of the ride. The bull bucks, rears, kicks, spins, and twists in an effort to throw the rider off. This continues for a number of seconds until the rider bucks off or dismounts after completing his ride. A loud buzzer announces the completion of an eight second ride. Throughout the ride, bullfighters, also popularly known as rodeo clowns, stay near the bull in order to aid the rider if necessary. When the ride ends, either intentionally or not, the bullfighters distract the bull to protect the rider from harm.

By this time light was gone. I have moved in close with a Nikon D700 body and the Nikon AF-S 50mm f1.8 lens. I shot all of these at ISO 6400, 1/1250 sec at f1.8. A fast prime like this is the only way to get anything under such poor lighting. Note these are right out of the camera with no noise reduction or any editing.


As always I suggest getting rid of the kit lens, even in very bright light. Using either fast primes like the Nikon 300mm f2.8 or the very inexpensive AF-S 50mm f1.8 will set your work apart in all light conditions..
There are hundreds of events like this all over the country every weekend. Look for smaller events like this to build your skill and practice working under poor conditions, The results will be worth it!


